Montessori Land and Water Forms: Inspiring Love for the Earth
Children are naturally fascinated by the world around them. The Land and Water Forms give children a hands-on way to explore the physical features of our planet. Through these simple materials, children learn about lakes, islands, peninsulas, and more; not through memorization, but through discovery and touch. They perfectly capture Maria Montessori’s belief that understanding begins through the senses.
In this blog, I will show you how to make your own Land and Water Forms at home and how to teach this lesson to your child. Don’t miss the free printables available below!
Target ages: 3 ½ – 4 ½
Peace Through Education
In traditional education, children often begin studying geography by learning about their immediate surroundings: their neighborhood, their city, and then their state or country. Only later do they expand their view to the rest of the world. This approach starts with “those who live like us,” and as the focus moves outward, differences are often emphasized. As a result, children can unintentionally develop a subtle sense of separation or prejudice toward those who seem “different.”
Dr. Maria Montessori turned this idea upside down. In the Montessori approach, we begin with a global vision. Children are first introduced to the Sandpaper Globe and the Painted Globe, helping them see the Earth as one whole planet that we all share. From there, they explore the continents with the Continent Puzzle Map and then gradually move to smaller units: countries, regions, and states.
This progression is supported by Geography pictures, where children see real images of people from around the world. These photos show how all humans share the same fundamental needs (food, clothing, shelter, etc.), even though we meet those needs in different ways. Through this work, children begin to see that people everywhere are more alike than different.
Imagine the impact of this perspective: instead of viewing others as strange or separate, the child recognizes a shared humanity. This early awareness can blossom into empathy, respect, and a deep sense of connection with all people.
At its heart, this is what Dr. Montessori called Peace Education: the cultivation of understanding and unity among all humankind, beginning with our children.
The Geography Area in Montessori
The Geography Area is part of the Cultural Curriculum in Montessori education. It helps children understand the world around them (its land, water, people, and cultures) in a concrete, hands-on way. Geography in Montessori isn’t simply about learning maps or memorizing country names; it’s about building awareness and connection to the Earth and all who share it.
The Purposes of Land and Water Forms
The purpose of the Land and Water Forms is not memorization, but understanding through experience. Through this material, children:
- Develop vocabulary related to geography (lake, island, peninsula, etc.).
- Begin to visualize land and water patterns found in nature.
- Build an early foundation for map reading and later cultural studies.
- Refine their fine motor skills and concentration as they shape the sand to create each land and water form.
Make Your Own Montessori Land and Water Forms
In the classroom, each Land and Water Form is presented in a pair of trays or models, one representing a land formation and the other its corresponding water formation. Children can pour water into them and see how land and water interact. In this blog, we will make the Land and Water Forms by shaping sand into the different forms instead. It is a very quick activity to put together with very few things from home, and such a fun one too!
What you’ll need:

- Two equal-sized boxes
- Blue construction paper
- Kinetic Sand or sand
- “Land and Water Forms” picture cards printable (we will only use the pictures, without names, for this lesson)
- Click here to download the cards in cursive
- Click here to download the cards in print
Instructions:
- Measure the bottom of your boxes.
- Cut two pieces of blue paper to match the size of the boxes’ base and lay them flat inside to represent the water.
- Print and laminate the “Land and Water Forms” printable (see links above).
- Put the Kinetic Sand in a container or a Ziploc bag.
- You are done!
How to teach Land and Water Forms to Your Child
Before presenting this activity, review the following definitions to ensure you can clearly explain each concept to your child. These are the pairs of land and water formations included in the lesson:
- Island and Lake: land surrounded by water / water surrounded by land.
- Peninsula and Gulf: land extending into water / water extending into land.
- Cape and Bay: a small piece of land extending into water / a small body of water extending into land.
- Isthmus and Strait: a narrow strip of land connecting two larger land areas / a narrow body of water connecting two larger bodies of water.
- Archipelago and System of Lakes: a group of islands / a group of lakes.
Land and Water Forms Lesson:

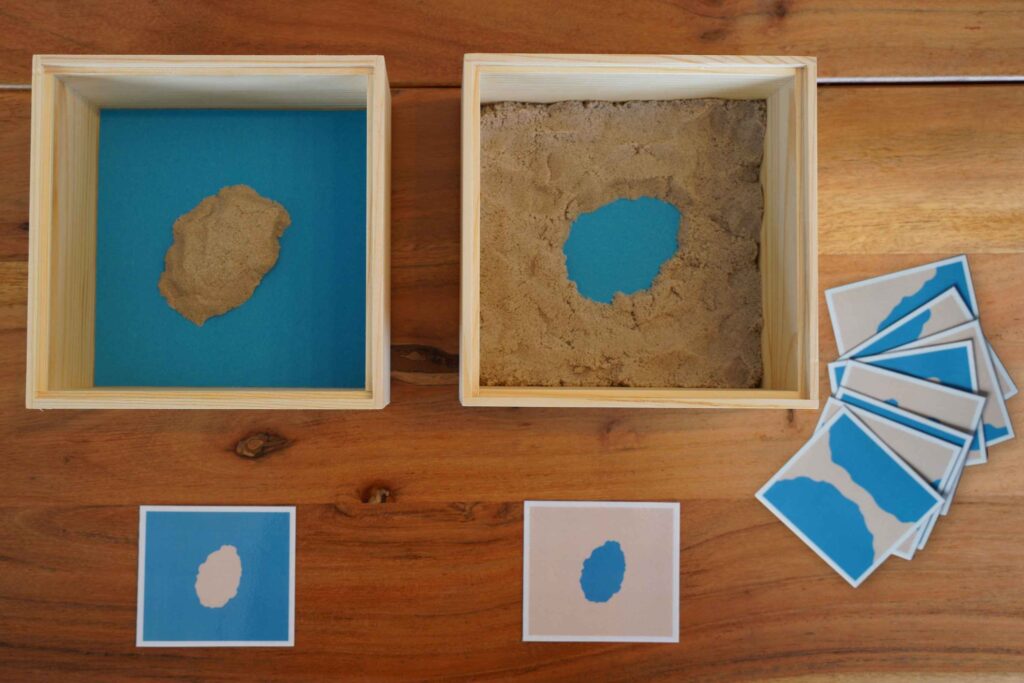
Choose one pair of Land and Water Forms to present to your child. For this example, we’ll use island and lake.
- Bring the materials to the table: picture cards for island and lake, the two boxes and Kinetic Sand.
- Show your child the picture card for “island” and explain: “This is an island. An island is land surrounded by water”.
- Show your child the picture card for “lake” and explain: “This is a lake. A lake is water surrounded by land”.
- Open the two boxes and explain that the blue paper represents the water.
- Show your child the Kinetic Sand, and tell them you’ll be creating an island in one box and a lake in the other.
- Place some sand in each box and shape it gently to form the land and water features.
- Do a Three Period Lesson so that your child learns the name of the forms:
- Naming: Point at the island and say: “this is an island”; point at the lake and say “this is a lake”.
- Recognition: Give your child simple commands so they can identify each form: (“stand next to island”, “touch lake”, “point to island”, “trace the lake”, “stand behind the island”, ect.). Make it fun!
- Recall: When you see your child feels comfortable recognizing each form, point to each one of them and ask every time: “what is this?”. Your child will say the name of land and water form. If they can’t remember, you can tell them and try this lesson again another day.
- When done, smooth out the sand and give your child a turn to make them.
- Fade and observe.
- When your child is done working, come back and show them how to clean up.
Extensions and Further Exploration

Once your child is familiar with the physical models, you can extend the lesson by showing real pictures (download the printable here) of land and water forms. This helps them connect what they’ve learned in the activity with the real world around them. You can download these pictures here!
Conclusion
As children explore these land and water forms, they begin to recognize patterns in nature, see connections between land and water, and develop a quiet respect for our planet. In the Montessori classroom, these small lessons grow into a lifelong awareness that we are all part of one beautiful, interconnected world.
Affiliate Disclaimer: Some links on this site are affiliate links. If you make a purchase, I may earn a small commission at no extra cost to you. As an Amazon Associate, I earn from qualifying purchases. I only share products I truly recommend.