How to Introduce Weaving: Setting Up a Frame and Getting Started
Weaving is a beautiful and calming activity that invites children to explore creativity, concentration, and fine motor skills. In this tutorial, you’ll learn how to set up a simple weaving frame, how to begin weaving alongside your child, and how to use the finished woven fabric in fun, purposeful projects. Whether you’re new to weaving or looking to add another meaningful activity to your home, this step-by-step guide will help you create a peaceful, engaging experience for you and your child to enjoy together.
Target ages: 3 and up
The Importance of Repetition
In Montessori education, repetition isn’t just about doing the same thing over and over, it’s about giving the child time and space to master a skill through practice. When a child repeats an activity they enjoy, they’re following an inner drive to perfect their movements, deepen their focus, and build understanding at their own pace.
Maria Montessori observed that children naturally repeat tasks that meet their developmental needs. Each repetition strengthens their concentration, coordination, and sense of order, while also fostering independence and self-confidence. Rather than rushing to the next activity, children learn through persistence, which is an essential part of developing a love for learning.
When it comes to weaving, repetition allows your child to find rhythm in the process: thread over, thread under, again and again. Over time, this steady repetition helps refine fine motor skills, develop patience, and create a sense of calm focus. You’ll often see children relax deeply into the task, proud of each line they complete and eager to continue.
Setting Up the Weaving Loom: Step-by-Step Guide
Before we begin weaving, it’s helpful to understand two key parts of the loom: the warp threads and the weft threads.
- Warp Threads: These are the vertical threads that run up and down the loom. Think of them as the “skeleton” of your weaving, they provide the structure that holds everything together.
- Weft Threads: These are the horizontal threads that your child will weave over and under the warp threads. The weft is what actually forms the fabric, creating patterns, colors, and texture as it crosses the warp threads.
In this section, we’ll focus on setting up the warp threads so your loom is ready for weaving.
Materials You’ll Need:
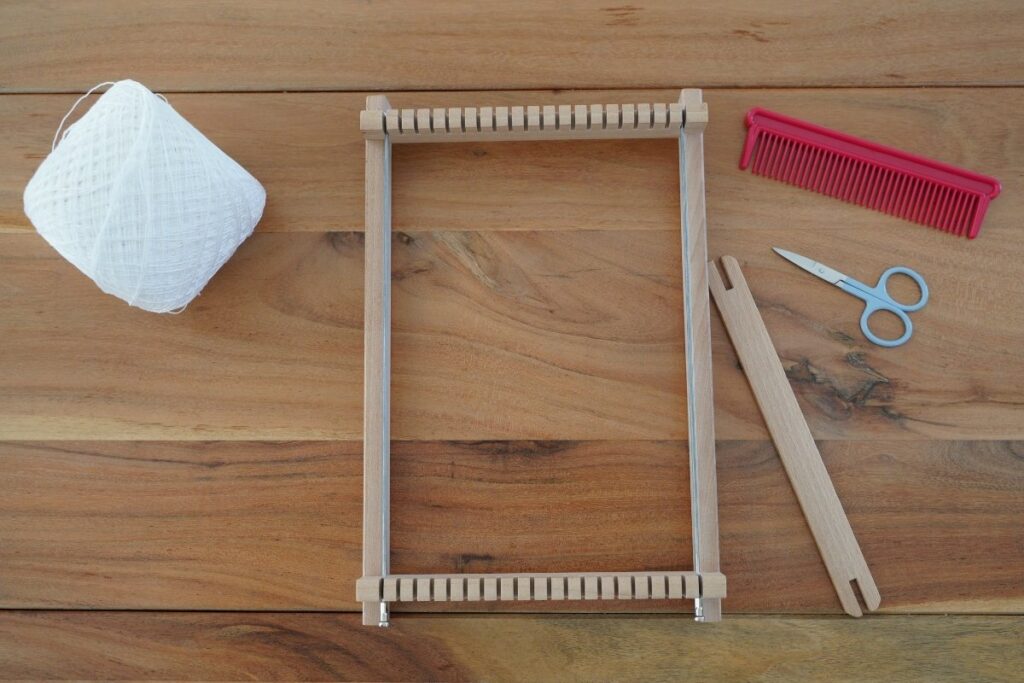
- A frame loom (this isn’t the exact one I have but it is similar and comes with everything you need)
- Non-stretch warp string
- Scissors
How to set up the loom:
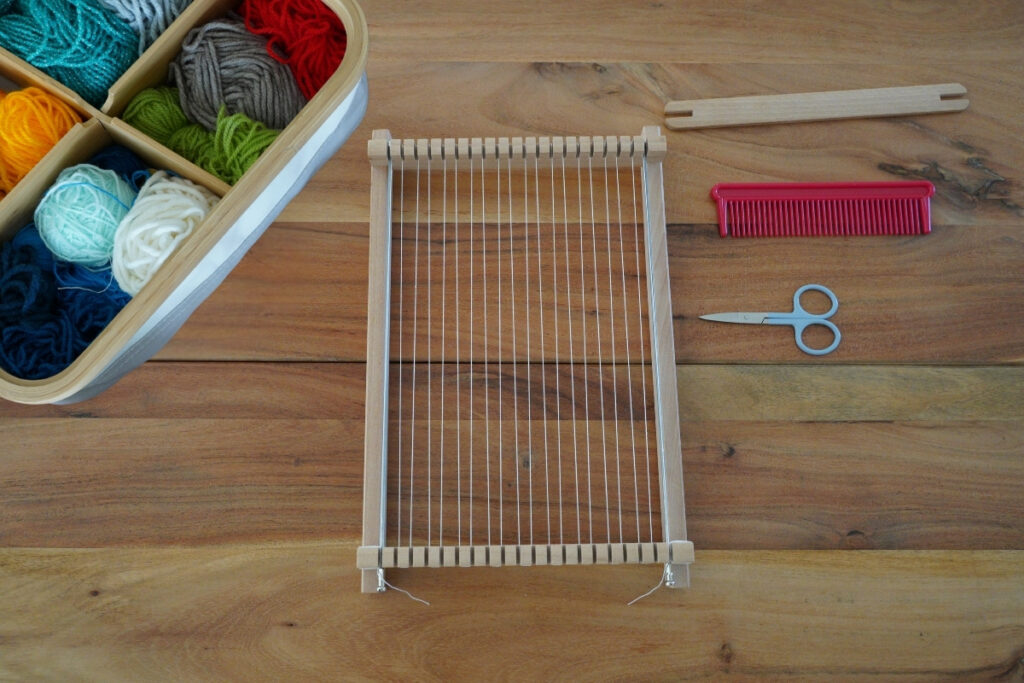
- Place the frame loom flat on the table.
- Place the two steel rods in the first and last indentations of the frame, one on each side. These rods are optional but help keep the weaving edges straight, preventing them from pulling inward due to tension.
- Tie a double knot with the string on the bottom left notch.

- Wrap the string a few times around the notch.

- Weave the string up and down through the notches until you reach the other side, creating tension. You should end up on the bottom right notch of the weaving loom.

- Wrap the string a few times around the bottom right notch.

- Secure the string by tying a double knot.

- Trim the end of the string.

Now your loom is ready for weaving!
How to Begin Weaving
Now that your loom is set up, it’s time to start weaving! In this section, you and your child will learn how to weave the weft threads (the horizontal threads) through the warp threads to create fabric, patterns, and texture.
Materials You’ll Need:
- A prepared frame loom
- A small comb (or your fingers)
- A weaving shuttle or needle
- Yarn with different colors and textures
- Scissors
How to begin weaving:
- Let your child choose a yarn color they like.
- Wrap the yarn around the shuttle a few times, leaving a long enough tail to cover the width of the loom. Then cut the yarn.

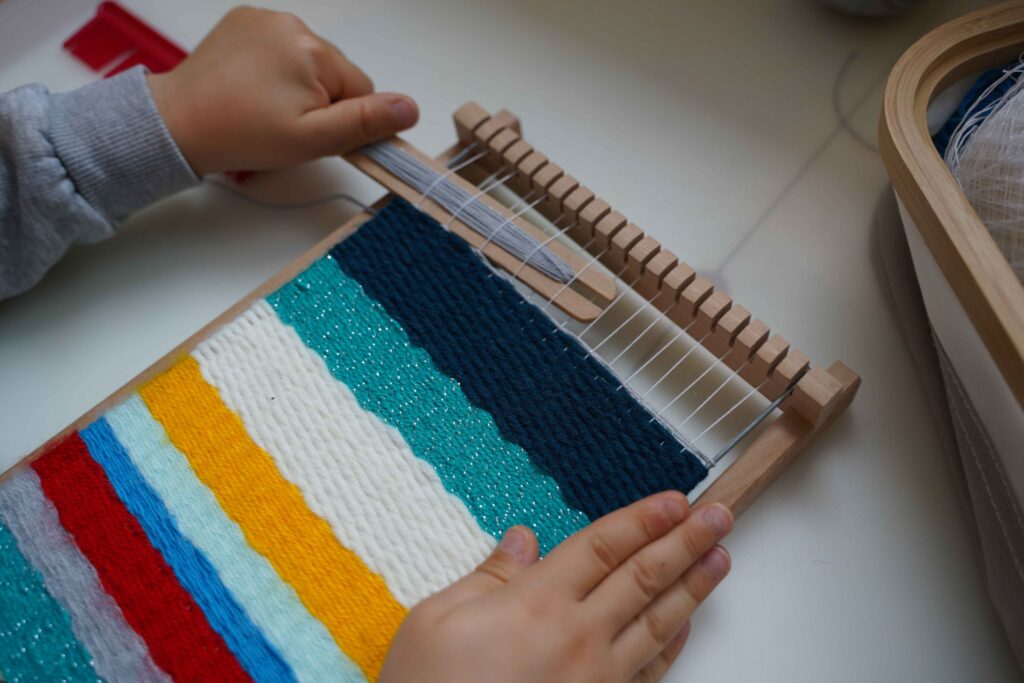
- Begin at the bottom right of the loom and weave the shuttle over and under the warp threads across to the left, leaving a tail on the right side.

- When you reach the left side of your frame, use the small comb (or your fingers) to gently push the yarn down so it sits snugly against the bottom of the loom. This keeps the weaving tight and even.

- Repeat the process going from left to right, continuing the over-under pattern.

- Continue going back and forth until you need to change colors.
- To add a new color:
- Cut the yarn, leaving a tail on the back of the loom.
- Wrap the new color yarn on the shuttle.
- Continue weaving from where you left off, no knots needed.

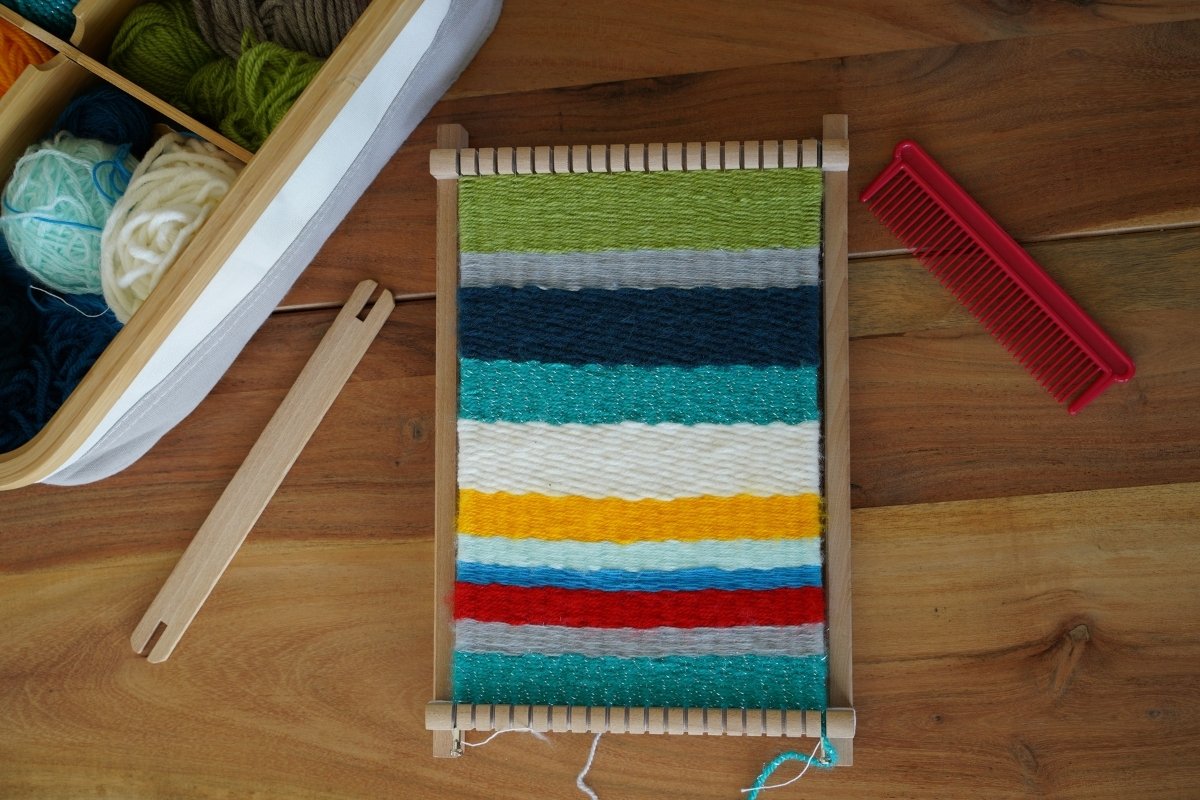
- Keep weaving row by row until your child reaches the top of the loom.
Important tips:
- Leave a tail: Always leave a small tail of yarn when changing colors. At the end, these tails can be sewn into the back of the weaving to keep everything neat and secure.

- Finish in the middle: When changing colors, try to end the yarn somewhere in the middle of your weaving instead of at the edges. This way, the tails will be hidden inside the fabric rather than showing on the sides. Then, continue weaving the next color from where you left off.
- Steel rods: Weave your yarn around the steel rods as part of the fabric. Once the weaving is complete, we will remove the rods.
- Use you fingers: When you’re nearly finished and there isn’t much space left at the top, use your fingers to weave the yarn through the threads.

How to Finish and Remove the Weaving
Once your child has reached the top of the loom, it’s time to carefully remove the weaving and finish it off.
Materials you’ll need:
- A needle
- Scissors
How to finish and remove the weaving:
- Gently unwrap the strings from both corners and unscrew the steel rods from each side.

- Take the warp threads off each notch of the loom to release the weaving.

- Flip the weaving over so you can see the back, where all the yarn ends are.

- Using a needle, sew the strings from the two bottom corners of your weaving to secure them:
- Thread one string through the needle.

- Following the direction of the vertical warp threads, gently tuck the needle under one of the yarn tunnels and pull the thread through to secure it. There’s no need for knots.

- Cut off any extra string.
- Thread one string through the needle.
- Sew the ends from the different yarns into the back of the weaving the same way to hide and secure them.

- This is how your weaving will look when all of your ends are secured; neat and tidy.

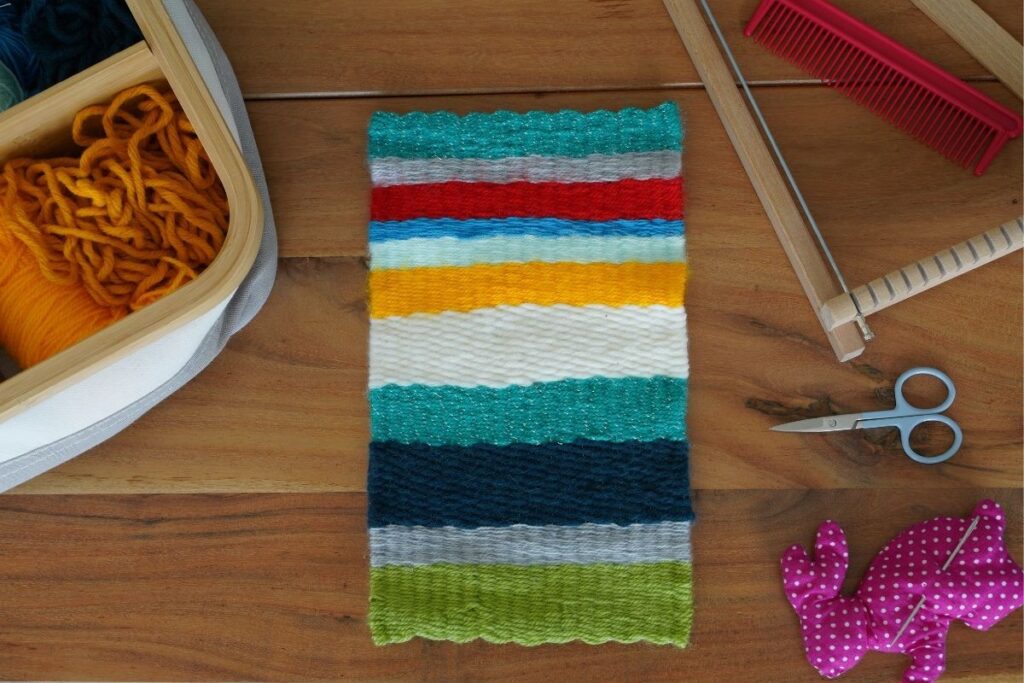
Now your beautiful weaving is ready to be used or displayed!
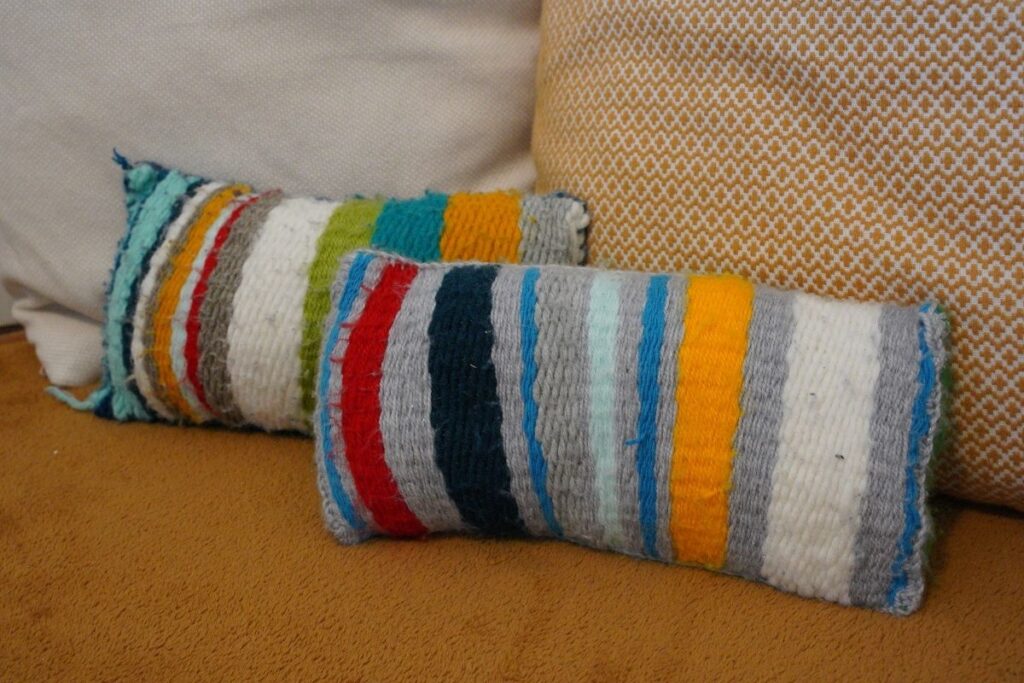
Fun Projects to Make With Your Woven Fabric
Now that your child’s weaving is complete, it’s time to turn it into something special! This is where creativity shines. Depending on the size and texture of your weaving, there are many ways you can use it. Here are a few ideas:
- Wall hanging: Attach a small wooden stick or branch to the top of the weaving and hang it on the wall. This makes a beautiful decoration and a proud display of your child’s work.
- Coaster or placemat: Smaller weavings can be used as coasters or small placemats. They add a handmade touch to your table and remind your child of what they created.
- Mini pouch or bag: Fold the weaving in half and stitch the sides to make a small pouch. Your child can use it to store treasures, beads, or craft materials.
- Pillow: This one is our favorite, we’ve made quite a few! You only need a rectangular piece of felt the same size as your weaving and some pillow stuffing. Stitch three sides of the weaving to the felt, fill the inside with pillow stuffing, and then stitch the last side closed. Now you have a cozy pillow featuring your child’s weaving!

Conclusion
Once your child has learned the rhythm of weaving (over, under, over, under) you’ll notice more than just a beautiful piece of fabric taking shape. You’ll see patience, focus, and curiosity growing with each row.
As with all Montessori activities, the process is as valuable as the product. Take your time, observe your child’s exploration, and celebrate the moments of discovery along the way. With each weaving project, your child will not only build practical skills but also a deeper appreciation for creating something with their own hands.
Affiliate Disclaimer: Some links on this site are affiliate links. If you make a purchase, I may earn a small commission at no extra cost to you. As an Amazon Associate, I earn from qualifying purchases. I only share products I truly recommend.
Oh I love this project! This looks like such fun. I used to have a weaving frame when I was a kid, and loved it! Your idea of making a pillow is awesome. They look really cool. I’ll have to share this with my grand daughter.
This is so cool! I had no idea weaving could be so simple. My kids will love this!
What a great tutorial! So thorough and easy to understand! We’ve done some weaving with our little ones over the years, but never used a loom like this. It’s so nice!
What a great skill and easy directions! Love the site!